Sunday 31 May 2015

The world of lighting in front of the lens

I’m sat by the Yonne river in Burgundy, squinting at the sun in front of me. Specular highlights on the brick next to me; the reflection of the water tickling the side of the ancient bridge; shade under the trees on the opposite bank. I’m thinking of brightness and colour relationships between the various sources, and how knowledge of these can be used if I ever wish to recreate some of the feeling of the light I’ve seen here today.

In my article Behind the Translation I outlined my view that we are judging our lighting solely through monitors and EVFs, and that this is causing us to lose touch with the physical reality of how the light is playing in the scene. The monitor can be a useful lighting tool, but if we are bound to it, we are severely limited in our ability to visualise, make proper use of a recce, pre-light, create lighting lists, achieve consistency, and ultimately, get what is in our heads onto the screen in a reliable manner. Your incident meter, your eye and your firm posture in front of the camera are the tools with which to understand how light is playing in the physical world.

Today I want to discuss this in a more practical manner by introducing the way I try to think about exposure and the light in the scene, and how a thought process like this can lead to valuable conclusions about how to light and expose.

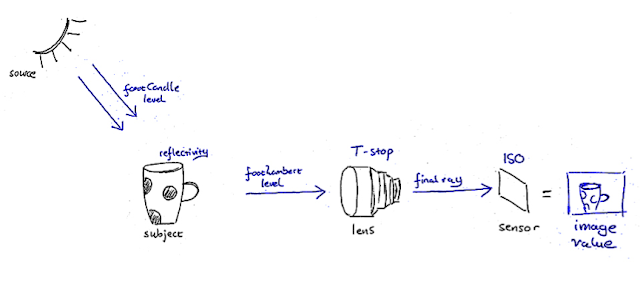
The diagram below is a conceptual illustration of exposure in terms of the chain of elements which create the image value for a given pixel, in the simplified case of matte subjects.


Obviously there’s no single correct way of picturing something, and this is just my way of breaking it down in my head. But what’s important is that I have a way, and every DP must have a clear picture in their head of how the physics of light and exposure come together to create the backbone of our craft.

Let’s say we have a white mug with black spots as our subject, as in the diagram. The footcandle level* expresses the amount of light falling on the subject. Let’s start with the simplified case that our subject is evenly lit. In this case, the same amount of footcandles falls on every part of the subject.

The subject has a range of different reflectivities, the main two being the white of the outside of the mug and the black of the spots. These two are vastly different in value. The footlambert level* expresses how bright a certain part of the object looks to the eye or to the camera, and it is a function of the footcandle level falling on that part as well as the reflectivity of that part. Although the same footcandle level falls everywhere on our mug, the white part of it has a much higher reflectivity and therefore creates a much higher footlambert level than the black part does, which causes the white part to look brighter than the black part.

Of course, it may be the case that there is a more complex light falling on the mug. Let’s say we have flagged our light source off half of the mug so that the flagged half has a much lower footcandle level falling on it. Even though the white of the mug has the same reflectivity everywhere, half of the white has a much higher footcandle level falling on it, and so generates a much higher footlambert level. The flagged part of the black spots generates a really tiny footlambert level, and hence looks very dark.

Sound easy? Okay then, answer this: we’re in a living room with a nice view into the garden, which is lit by a scorching hot sun. There’s a black shirt out to dry outside, and our friend inside is wearing a white shirt. We can all picture from experience that no matter how dark it is inside, the white shirt inside will still look much whiter than the black shirt outside. The black shirt, despite being of low reflectivity, is under such a high footcandle level that it is giving off a higher footlambert level than the white shirt inside. So how is it possible that the white shirt still looks brighter than the black shirt?

The answer is that the human visual system has what we might call spatially adaptive light sensitivity, and determines the brightness of objects by comparing their footlambert levels to what’s immediately surrounding them. So the whole of the area visible outside the window is ‘reduced’ in exposure by our visual system while what’s inside is amplified. This is what allows us our visual system to have such extraordinary dynamic range. And, as you might have suspected, cameras don’t do this. If you expose for the white shirt, and the black shirt outside is indeed emitting more footlambert, the black shirt will look whiter than the white shirt in our footage.

So, to summarise what happens in front of the lens: every part of the scene in front of us is giving off a footlambert level which determines how bright that part of the scene looks. That footlambert level is a function of the footcandle level falling on that part of the scene and the reflectivity of that part of the scene. This is actually only the case for matte subjects. Glossy and mirror-like subjects and self-illuminating subjects are a slightly different story, but they still ultimately present a footlambert level.

So what happens after that? The footlambert ray representing a given part of the scene passes through the lens and is affected by the T stop set on that lens before being focused onto the sensor or film. There is no term in common usage to describe the ray of light after it has been affected by the T stop, so I coined the term final ray. Understanding this bit is key to understanding ISO and where to rate cameras, but that’s for another article - let’s get back to the scene in front of the lens.

Consider that a camera sees only footlambert levels. It does not know anything about footcandles, and it does not know anything about reflectivities. It cannot distinguish whether the footlambert level it sees is coming from a black shirt under bright sunlight or a white shirt in the shade. Ansel Adams’ zone system, which is well worth studying**, comes out of this basic truth, and is all about measuring footlambert levels using a spot meter and using our taste and pre-visualisation skills to decide how bright the part of the subject that gave rise to that footlambert level should appear in the final image.

The issue is this: the camera does not know a black shirt from a white one. A reflective meter – such as a spot meter – also doesn’t. If you read a footlambert level with a spot meter and translate the reading directly onto the lens, you’ll get an image in which the part of the subject which gave rise to the footlambert level you measured is rendered as middle grey, that is, in the middle of the dynamic range. The problem is that neither a black shirt nor a white shirt should be middle grey. The first way to fix this is essentially the zone system: read the footlambert level, judge how many stops above middle grey the part of the subject you just measured should be rendered, adjust the reading by that amount (so you’d overexpose the reading a few stops for a white shirt, and underexpose it a few stops for a black one) and put the adjusted reading on the lens. Caucasian skin tone, for example, is typically exposed around one stop over its spot reading.

But there is another method, in which you don’t have to guess how many stops above or below middle grey you want a particular object to be rendered: the incident meter. Our incident meters are actually measuring footcandles – the amount of light falling on a subject***. That’s why we use an incident meter at the subject. The white dome on your meter takes an average of the footcandle levels falling on it over a solid angle of 180degrees. Pointing the dome at the camera gives you a useful average footcandle reading of the light falling on the front side of your subject. Reading to the source rather than the camera tells you how many footcandles are coming from that source.

If we take an incident reading of a given footcandle level and put the T-stop readout on the lens, we will expose such that a middle grey reflectivity under that footcandle level is rendered in the middle of the dynamic range, and all reflectivities above and below, provided that they are lit by the same footcandle level, will be rendered above and below in the correct proportion. This way the guesswork is taken out of it – we don’t need to decide where to place individual reflectivities, but only what source to pick as our key. Obviously no real scene is lit by a single equal footcandle level, so we have to decide what footcandle level to treat as ‘normal’, or in jargon, as key. The key footcandle level is the footcandle level under which a middle grey reflectance falls in the middle of the dynamic range, and it is set by reading what you’ve decided is that level and setting the resulting T stop on the lens.

From here onwards, it’s a question of personal preference of exposure methods, and as usual, the important thing is not what your method is, but the fact you have one. I personally read to the source, not to the camera, and then decide how many stops above or below key to place that source. I think of a light source being at, above or below key.

A cloudy sky might be at key (so I read the light and place that stop on the lens) whereas sunlight be one to two stops above key (so I read directly to the sun and overexpose the reading by one to two stops). How do I decide where to place a given source? The sun needs to feel bright so needs to be above key – that’s an easy one. But how about a scene consisting of two areas lit by two different sources of different brightness? How about a wide shot of a subject at a table lit by a lamp with darkness all around? We’ll see later that the most important thing is actually the difference between readings of various sources. It depends on your taste and judgement. This is the art of exposure, and it’s inextricably bound with the art of lighting. What do we want to draw attention to, what do we want to keep in the shade, where do we want to direct the eye? What feeling do we want to evoke? What do we want it to look like? These are the important questions, and everything we’ve said above is only useful insofar as it helps us get what is in our heads consistently onto the screen. 

I’m going to present a few frames from my own work as specific examples of interesting situations in terms of how to read the light and set an exposure. All images are copyright of their respective owners - the first two are from TryLife: Jacob's Story and the third from Tea for Two.


Apart from the funny anecdote that I used a mirror to reflect in the light from a unit outside which we didn’t have a high enough stand for, this is an interesting shot in terms of exposure because nothing is at key. The shafts of light on his eye and on the bed are over two stops above key, and anything on the face which isn’t hit by those shafts is below key. Let’s review what I mean by that: reading those shafts to the source reveals a number that is more than two stops closed from the shooting stop, and reading any part of the face not hit by those shafts reveals a number that is further open than the lens is. How would I actually decide on the stop? What actually happened on the day is that this was the last shot in the scene, and my shooting stop was established earlier in the scene, on a shot roughly like this:


I metered and lit this with the idea that there should be bright light coming from the window but that the room should still be dark. At the character’s face position, the window reading should be a couple of stops over, and the reading away from the window should be severely under. So the process might be:

(1)  Set lights outside window and position of blinds to visual taste
(2)  Read to window at face position
(3)  Set shooting stop to be 1-2 stops closed from this reading
(4)  Read away from window and adjust fill or negative fill until this reading is sufficiently under the shooting stop

Although in practice, it’s likely that once I had the shooting stop, I set the fill (negative, in this case) by eye and just quickly checked that the reading was far enough under key.

Having established a shooting stop for the scene, when I came to the close-up of the character lying down in bed, I maintained that stop and it was a matter of controlling the brightness of those beams to make them look right for the shooting stop, and I did that by eye. I’m quite comfortable doing things like that by eye, and using the security blanket of the monitor to make sure I’m not blowing anything. On film, a spot meter would come out quickly to make sure those beams were in range. On digital, it’s very easy to use a monitor or waveform to check we’re not clipping. And using a monitor in that way is not a problem – it’s using it to its strengths.

Once we have this contact with the reality of the light in the scene, we can use the monitor to it’s strengths and still be confident that we understand what’s happening with the light in the scene. We know what’s going on, we know that it’s unimportant exactly where the beams fall exposure wise, as long as they’re bright and as long as they don’t clip. So you use your eye and your taste, and you check the monitor for clipping.


This is another example of nothing really at key. The front of our character’s face is under key, and if we were to read to her ‘kicker’, the light that’s falling on her left ear and shoulder, the reading would be slightly above key. And pretty much everything behind her reads above that. To light and expose this, you’d start with the controlling idea that her face should be below key and that the background should be quite a lot brighter than that, decide shooting stop using a reading of your choice – eg ‘her face should be 1.5 below key’ and then check other readings against your shooting stop and tweak lights to get those readings where you want them. In the case of this specific shot it would actually be easier to tweak the face lighting, but whatever you’re tweaking, it should be apparent by now that what really matters is the contrast – the difference in reading between the various elements. It’s pretty easy to print up or down a little in the grade. It’s much harder to make changes to scene contrast in a pleasing way, and pretty much impossible in most cases to isolate the effect of a specific source and globally ‘brighten’ or ‘darken’ that source with respect to the rest of the scene.

The only reason why ‘key’ and ‘shooting stop’ are important is that they are a benchmark against which to measure differences in reading. We’re talking about one reading being a little below and one being above as a way of talking about the difference between two readings. Face -1 and background +2 or face at key and background +3? The choice between those two is not as important as the decision that the difference between the two is 3 stops.

This concept also applies to colour temperature – it’s not too hard to warm up and cool down the overall shot slightly in post – but it’s nigh on impossible to change the warmth or coolness of a specific source relative to another. The difference in colour temperature between two sources working in one shot is much more important than where we set the white balance.

So what I’m really asking myself when I light, once I’ve decided what something should look like, is: what is the brightness relationship between the different sources playing in this scene? What is the colour relationship between them? And once that’s clear in my head, where to set the white balance, and where to set the shooting stop, is mostly a matter of what to show everyone in the edit and in dailies. The key decision is about relationships, contrast, differences.

I’m not in Burgundy anymore. It’s taken me so long to write this that I’m in a café in Bristol, and yet we’ve only dealt with the tip of the iceberg that is the physicality of light in space. It’s the beginning of a mindset that leads us to think with the camera “behind us”. We’re not thinking about what’s on the monitor, we’re thinking in terms of footcandles, keys, reflectivity, footlamberts. We no longer have to light from behind the camera and the monitor, but we can use those tools to our advantage when we judge that it’s useful. We can light with our eyes and our understanding of how the light is playing in the scene, and then walk back to the viewfinder confident.

L.

Burgundy and Bristol, May 2015


*The footcandle level is more formally known as the illuminance, and is measured in footcandles. The footlambert level is formally known as the luminance, and is measured in footlamberts.

**Read The Negative and The Print by Ansel Adams.

 ***They give you a T stop once you tell them what ISO and frame rate you’re shooting at, but what they’re actually measuring is footcandles, and the ones specialised for cinematography can read out directly in footcandles.


Monday 8 July 2013

Behind the translation


Picture © Guy Armitage / Sleepless Films


With film, we knew that looking through the viewfinder was equivalent, as far as exposing a scene, to looking at the scene with our naked eyes. The ‘monitor’ was just a video tap, a video camera in the viewfinder, and as such was of no help in exposing a scene. Nothing could be gleaned, as far as exposure, that could not be gleaned from looking at the scene directly. DPs knew they only had their eye, their meter and their experience of how to use both to help them determine how the scene would photograph, and they therefore used their eyes and their meters, and gained experience.

And then came the digital camera. Now we are shown a real-time digital image captured by the sensor. For the first time, we have direct access to how the scene looks once photographed. By and large, we can ‘see what we’re getting’. What is the result? Those of us who are too early in our careers to have deep-set habits (and those who have only known digital) are bound to end up doing all our work through the monitor or EVF (electronic viewfinder – a little monitor inside an eyepiece). A self-operating DP will necessarily end up being in the EVF most of the time, and how could a non-operating DP resist the luxuries of the monitor?

Before, we were looking at the scene. Now, we’re looking at a translation of it. Before, we were necessarily in constant contact with the scene itself. Now we need not be. It is conceivable to be, and in fact everything about the technology encourages us to be, in contact only with the translation (See false colour, in-camera metering, the HUD-like nature of the modern EVF – ‘Look here!’, it says, ‘Everything of importance is right here!’). Now that we need only interface directly with the translation, over time we will lose the ability to interface with anything other than the translation, that is, we will lose the ability to look at a scene and know, or at least understand something about, how it will photograph. We won’t know what our light meter is telling us in relation to what our lens is set to (‘What should I know what the lens is set to? I just rotated it to where the histogram looked good’), how many footcandles are kicking about, what the contrast ratios are. Not only as individuals, but as a collective conscience, we will get trapped behind the translation, we will lose the big picture, and in so doing, our understanding of the building blocks of our craft will be diluted.

Anyone who is not persuaded that the corrosion of the craft is anything to fuss about might be swayed by the thought of how one of these new translation-centric DPs is going to answer when the studio asks how many space lights he wants hung (‘I don’t know, I’ll decide when I look through the camera’) or when he finds himself at a recce, unable to make any real lighting decisions. I’m sad to say that many working DPs are in the midst of this conundrum, and they are routinely saved either by the kind of work that does not require them to make decisions before the camera turns up, or by their gaffers, who, not being able to constantly look through the camera, develop a real ability to eyeball a scene and determine ‘off-line’ what units might be appropriate. I don’t exclude myself from the list of these DPs – but at least I admit that there is a problem and I’m seeing what I can do about it.

I said before that we risk getting trapped behind the translation. That’s exactly how I see it: since we are looking at everything through the translation, the process is effectively in front of us, between us and the scene. With the optical viewfinder, the process was necessarily behind us. What does it mean for the process to be behind us? It means that we are in direct contact with the scene itself, using our eye, meter and experience to expose the scene.

The guiding idea here is that the camera is incidental, not in the sense that it’s unimportant, but that our understanding of the scene in front of us is largely independent of it. Not independent of a lens stop – we’ll factor that in when we meter – but of dynamic range, viewing LUTs, monitor-to-monitor and EVF-to-monitor discrepancies, miscalibrations, ambiguity about grading pipeline, that is, all the stuff that is going to get in the way of a proper understanding of footcandles, footlamberts, ISO ratings and T-stops unless we find a way to stop it clouding our big-picture view of exposure. Yes, we will have to adapt our work to what camera is capturing it, and yes, it’d be arrogant not to take a peek at the monitor, but we shouldn’t be dependent on these things for our understanding of what’s going on with the light in the scene.

I’ve tried to show this by way of a simple diagram.


(A) was how film worked – one had to look directly at the scene, and had no access to the translation. (B) is the paradigm reinforced by digital camera systems – we only get at the scene through the translation. (C) is an interesting mix brought to our attention by digital cameras with optical viewfinders, such as the D21 and Alexa Studio – using the optical viewfinder to look straight at the scene, and referencing the monitor where necessary. In my view this represents the ideal scenario – staying in touch with the scene whilst taking advantage of the digital technology. You don’t need an optical viewfinder to work in this paradigm – with a bit of effort, you can use it with any digital camera. How? First, by studying any bit of theory that brings you closer to a holistic view of the whole thing. Footcandles, footlamberts, the zone system, darkroom work, whatever you find useful. Second, by incorporating a light meter into your working method (I’ll discuss the light meter in more detail in an upcoming article). Third, by doing some lighting by eye before you bring the camera in, or at least eyeballing a shot and considering how it might photograph before you check your hypothesis in the monitor (Which might be what I’m doing in the photo, apart from looking completely demented). The last two should ideally be done together – after all, they represent two elements of the holy trinity – eye, meter and experience – and their careful application will eventually bring about the third.

As I said at the beginning, the above is helpful to those of us who are too early in our careers to have deep-set habits and those who have only known digital, that is, those who are in danger of getting stuck behind the translation. Once we have established the habit of looking and using the meter, we may of course light the occasional shot or day’s work through the camera. Are we going to run a hundred feet to meter something while everyone is waiting for us? Probably not. But if we’ve done the hard work, lighting through the camera becomes an additional tool in our arsenal, rather than a limiting factor on our mastery of the craft. And thinking of it as a tool rather than the normal process makes a lot more sense in an age where we meter Rec709 and record Log, or meter redgamma3 only to then start from scratch in the grade. Just like we ask ‘How does this meter?’, or ‘How does this look to my eye?’ we can ask ‘How does this look in Rec709 vs Arri LCC vs Log?’ knowing that the log we’re recording is never going to resemble the finished image. Top DPs switching to digital say they love being able to see what they’re getting. Of course they do – they are adding that tool to a lifetime of using their eyes and their meters, and ‘added’ in this fashion, digital monitoring can only be a good thing.

L.

Rome, July 2013


Sunday 14 April 2013

Proximity


This is a celebration of camera-to-subject distance. Powerful and misunderstood in equal measure, it’s an incredibly important property of any shot. We’ll go through some basic theory, I’ll describe the psychological implications I believe it to have, and we’ll look at how understanding these can affect the way you design shot structures for a scene.


In normal life, things that are closer to us appear bigger and things that are further away appear smaller.

Let’s call depth the dimension passing through the lens and receding from the camera in the direction it is pointing. The apparent size at camera of an object of a given size depends on its distance to the camera. The depth difference is the distance between two objects along the depth. A depth difference amongst two objects of equal physical size will give rise to a difference in apparent size at camera.

I want to call depth rendition what some people call depth compression/expansion and yet others refer to as perspective, perspective distortion or one of any number of terms. I use it to describe the difference in apparent size caused by a given depth difference between objects of equal physical size. If we create a depth difference between two identical objects, a frame in which these two objects appear very different in size exhibits expanded depth rendition compared to a frame in which they appear similar in size. The latter is said to be compressed in rendition.

Take a situation where objects A and B are the same physical size, but there is a depth difference (A-B) between them giving rise to a difference in apparent size at the camera. The ratio of A’s apparent size to B’s apparent size is equal to the ratio between their distances to the camera. It can thus be said that the difference in apparent size depends on the ratio between the depth difference and the distance between the camera and the first object. It’s not the absolute distance between the objects that counts, but rather how significant this distance is in comparison to the camera-to-subject distance. If the camera is a hundred feet away, a one foot separation between two objects is not going to make them look very different in size in the frame. But that same one foot distance is going to produce a massive size difference if the camera is two inches away from the closer object – why? Because that same one foot is large in comparison to two inches, but tiny in comparison to a hundred feet. Since depth rendition is nothing but the apparent size difference created by a given depth difference, we can say that depth rendition is a function of camera to subject distance.

It’s the same mathematical relationship according to which focus has to be pulled faster as the subject gets closer to the lens, or printing time differences in the darkroom have to be measured relative to the total exposure. Someone who prints in the darkroom will understand all this discussion in a pinch, because if I ask them “How many stops extra is 2 seconds printing time?” they’ll reply “It depends what your basic exposure was. It was 2 seconds, another 2 seconds is a stop. If it was 160 seconds, you won’t see that extra 2”.

(The mathematically inclined can enjoy a more rigorous proof here.)

Assuming you understand the above, now consider what most photography students hear in a classroom, and therefore carry through to their careers: “Depth compression/expansion is the effect whereby the lens used alters the relationship between depth difference and perceived size difference from what is seen to be ‘normal’. Wide lenses exhibit depth expansion, whereby small differences in depth give rise to large differences in perceived size, so that an object can be made massive in relation to another just by moving it closer to the lens, and size differences are exaggerated. Long lenses exhibit depth compression, whereby differences in depth do not give rise to large perceived size variations, so we can move something close to the lens or put it way in the background and its perceived size does not change much.”

In much the same way that non-experts in aviation have a mistaken view of how wings work, non-experts in photography and cinematography have a mistaken view of how focal lengths affect depth rendition. Depth rendition is not affected by focal length. It depends only upon camera-to-subject distance. If we maintain our camera-to-subject distance and change focal length, depth rendition does not change. The only way focal length affects depth rendition is if we decide to keep subject size in the frame the same, because then we have to move the camera further from or closer to the subject and this changes the depth rendition. So a wide lens seems to expand perspective because it forces us to move closer. A long lens seems to compress perspective because it forces us to move further back. In fact, there is no depth rendition difference between using a 100m and cropping into a 32mm shot to obtain the same field of view.

Think about what would happen if this wasn’t the case: if each focal length had a unique depth characteristic, and if using different focal lengths changed depth rendition even if we did not move. Different sensor sizes force us to use different focal lengths to achieve the same field of view, so every different sized sensor would have different depth rendition characteristics. Very small sensors would massively expand perspective whereas Imax cameras would compress them like crazy. And we know that’s obviously not the case – if I stand a 2/3” chip camera next to a 35mm camera, at the same distance from the subject, and use whatever focal length is required to achieve the same field of view, the depth rendition will be the same on both cameras even though I’m using a much longer focal length on the larger chip camera.

Let’s be clear – we are not wrong when we swing a wider lens because we want more depth expansion. But unless we realise that it’s not the lens itself, but the fact this lens allows us to move closer than a longer lens to attain the same subject size in the frame, then we have an inaccurate picture of what’s really going on, and the reason I make such a big deal out of a seemingly small incompleteness in understanding is that without understanding this properly, it is impossible to make use of the phenomenon I’m about to describe. Read on!

We’ve established that depth rendition depends only on viewer to subject distance. This is true for the human eye, and it’s true for the camera. It must follow that the visual system is used to using the depth cues in a scene to help determine distances. No matter what lens you use, the distance between the camera and the subject is ineluctable and is forever imprinted in the image in the form of depth cues which the viewer’s visual system is subconsciously reading all the time and using to draw conclusions about distance. This is the central contention of this article. It is the reason street photographers are told to ‘get in there’ rather than use a long lens. Once a director told me she wanted to get ‘close’ to the characters by using a long lens. She may have a unique way of seeing, but it’s more likely she misunderstood lenses; the way to get close to the character is to move the camera closer!

On a short I shot earlier this year, our protagonist spots two characters interacting across the road, and stops to look at them. We started the scene tracking with him on a 35mm, and stopped with him. The director then wanted a shot of the two characters across the road. I just walked across with the 35mm on and lined up a two shot, and the director commented that it just didn’t feel right. After thinking about it for a second, I realized that it was a question of narrative point of view. We are telling this scene from this character’s narrative point of view, so even if the shot of the characters across the road is not a literal POV, it will only feel like the scene is consistently in our lead’s narrative point of view if we keep the camera close to him and switch to a longer lens to shoot the characters across the road. We shot it on an 85mm. The camera to subject distance is many times greater than the distance between any two elements in the frame, creating our so-called depth compression. Our brain is used to reading these depth cues continuously, so it effortlessly and subconsciously realizes that it is seeing these characters from some distance away, and concludes that this must be something like what our character across the road is seeing, even though the size of the two characters in the frame is identical to how I had them in the 35mm version. The only thing that has changed is the depth cues produced by moving the camera back across the road.

Instead of using the term camera-to-subject distance, I’d like to call it proximity. I owe this terminology to director Oscar Nobi, who came up with it whilst discussing depth rendition in his film "Sorinne". To the writer Gul Davis, on the other hand, I owe the term narrative point of view, which I used in the example above. This doesn’t refer to what we filmmakers understand as ‘POV’, where the camera is the character’s eyes, but to whether we are telling the story from the perspective of a particular character at any given point in the film. If there is considerable physical distance between two characters and we choose to keep the camera nearer one of them, we are telling the story from his narrative point of view, no matter the focal lengths we use or what we point the camera at, because the eye reads the depth cues.

Consider instead a scene with only one character. What happens when we vary the proximity? There’s something I’ll call emotional distance, which is what it sounds like – how close we feel emotionally to a certain character. In real life, if we are physically close to someone, chances are we have an emotional connection with them, and conversely, we don’t usually share emotional moments across canyons so long distances tend to evoke emotional detachment. This is not a straight relationship - it depends on the context – but more often than not, emotional distance is linked in some way to proximity.

Sometimes you wish to maintain a consistent proximity between two shots for various reasons: narrative point of view, emotional distance, whatever it is. In the example from my short, it was a question of coherent narrative point of view throughout the scene. In this case it would make sense to use a similar proximity but change the lens. Sometimes you wish to modulate proximity throughout the scene, for example to get increasingly emotionally close to a character as the scene goes on. In this case, physically moving the camera between shots will do the trick. What about zoom moves versus dolly moves? Pushing in to a character using a dolly alters the proximity, whereas zooming in does not. Zoom moves are largely out of fashion nowadays, and that’s a shame, because there is a unique feeling to a zoom move that can be very appropriate in certain situations – we’re making things bigger or smaller in the frame whilst keeping the proximity constant.

I want to emphasize here that once we have established what proximity we want and why, and put our camera down in the desired place, the feeling created by that proximity is not affected by our choice of focal length. How I like to think of it, at least for the scenes in which we are clearly in a character’s narrative point of view, is that given the correct proximity for that point of view, different focal lengths create different impressions of focus of visual attention. Here’s a very good example: in Casino Royale, there’s a scene at the airport in which Bond is among the airplanes looking for the villain and spots a dead body next to a fuel truck. We have a shot of Bond, and cut to something like his point of view, and then have a series of shots cut together quickly, where the camera stays where it is and a longer and longer lens is used for each shot (or a zoom is punched in between each shot). This sequence is incredibly effective in giving us the feeling that bond is ‘homing in’, suddenly registering the importance of what he’s just seen, and focusing his attention on it. It’s the feeling of a zoom move but done in a series of cuts rather than a zooming in; it has a starkness and urgency that fits the scene.

Formalizing the above, it could be said that when we are roughly seeking to mimic the human eye with the camera, proximity controls the depth rendition; the feeling of closeness, and focal length controls the impression of focus of visual attention. This is why I think the term ‘normal lens’ is bogus. Back in my photography days one of the big discussion points was whether the 35 or the 50 was the ‘normal lens’. Attempting to find a focal length that matches the human eye is missing the point. We can’t be trying to find a focal length that matches the depth rendition of the human visual system, because we’ve established that depth rendition depends on where we stand and is independent of focal length. So we must be trying to find a focal length with a  field of view that matches the human visual system. But the human visual system is a dynamic entity that adapts to the situation at hand and cannot be thought of simply as a camera with a prime lens on it, fixed at a certain field of view. If we strain to be aware of our entire field of view, we can see at least 180º horizontally and vertically, way more than an 8mm! But if we, like James Bond, suddenly spot a dead body in the distance, our field of view, perceptually speaking, decreases drastically as our attention becomes focused on that area directly in front of us. When simulating the eye, instead of trying to find a ‘normal lens’ we should think about what the perceptual focus of attention would be for the situation at hand. As I said, changing focal lengths is an excellent way of simulating various degrees of perceptual attention on what is in front of us. Bond sees a dead body indicating the presence of the villain: BANG, BANG, BANG, we cut to progressively longer focal lengths, the perfect analogy for the focusing of attention on a small area of our field of view.


Now that I’ve explained the importance of proximity, let’s pitch it against focal length in terms of how working cameramen line up shots.

Assuming we’re on the same camera throughout the show, we have three factors: subject size in frame, proximity and focal length. We will typically choose two of these to our taste, which dictates what the final one should be.  I realize that real world shooting situations are more complicated, that we may be blocking things to the camera, etc, but I believe that most of the time we are, either consciously or subconsciously, tending towards one of two mindsets:

1 )   Knowing the frame size we want, choosing a focal length, and moving the camera into a position that gives us the desired frame size with the chosen lens on.
2 )   Knowing the frame size we want, knowing the proximity we want, and selecting the focal length that gives us the desired frame size from the chosen camera position.

Although both of these mindsets can be executed easily with either a zoom or primes, it is easy to imagine how someone who wasn’t too conscious of how they were making these decisions would be prone to lapsing into mindset 1) if using primes and mindset 2) if using a zoom.

Common wisdom has it that zoom lenses are bad training for a DP,
because you'll have a tendency to keep the camera where it is and just 'punch in and out' on the zoom to reframe the shot. But just like using a zoom lens may reinforce the habit of staying where one is and punching in, destroying any field of view consistency and proximity variation, using primes may reinforce the habit of staying on one field of view and moving around, destroying any proximity consistency and field of view variation.

I’ll give an example. A character is in a room, another knocks and leans against the doorjamb on the other side of the room. We want close-ups of both. Your standard ‘prime trained’ shooter may elect to shoot both on the 50mm, matching camera-to-subject distance between setups. But what if we want to tell this scene from the narrative point of view of the character in the room? We could shoot his close-up on a 35, and just turn the camera around and pop an 85 without moving for the other character’s close-up. The audience will subconsciously read the depth cues, even if the head sizes in frame are exactly the same, and as we cut between the two angles they will subliminally perceive that the scene is being told from the narrative standpoint of the character in the room.

Another James Bond example for the above: In the Macau casino segment in Skyfall, bond spots Severine from the other side of the room. The first time we see her, it’s in a wide from Bond’s position. We then have a close up of Bond, shot on something like a 27 or 32. For all we know they kept the camera where it was, same lens, and spun it around. Then we cut to a long lens two-shot of Severine and her bodyguard from the same camera position as the wide. She turns around and sees him. Cut back to Bond’s close-up. The fact that the camera is kept where it is throughout this small sequence means that we are firmly in Bond’s narrative point of view. Up until now in the film, the camera has always been closer to Bond than it has to Severine, so that when she finally approaches him it is the first time we have a close proximity to her.

Isn’t that a higher level of storytelling with the camera compared to popping a 50 and matching distances? Some will say: “But you’ve introduced focal length inconsistency and camera-to-subject distance (depth rendition) inconsistency!” But what we have maintained is consistent narrative point of view: Bond’s. And that can be a much more powerful storytelling tool than focal length or depth rendition consistency. Of course, you may choose to treat both characters with equal emotional distance, in which case the same lens and same camera-to-subject distance may be entirely the right thing. But you’ve arrived at the solution through a much more considered process than “Here are the close-ups, get the 50”.

Obviously beginning shooters don’t really use a conscious thought process, they just go by eye and try to do the best they can. It is my contention that once you are past being a total beginner at lining up shots, there is a tendency to really focus on the focal length and get into that same focal-length centric mindset that then leads you to say things like ‘The zoom lens forms bad habits’. Zooms can form bad habits, but so can primes. The real perversity of the whole anti-zoom school is that they will usually say that using primes really teaches you about lenses and their unique depth characteristics whereas the truth is that unique depth characteristics belong not to focal lengths but to camera-to-subject distances, proximities, awareness of which might well be brought about better by shooting with a zoom that with shooting with primes! Despite this, I do ultimately agree that a zoom is a bad tool to learn on, because a beginner should always be aware of what lens they are on. Although sometimes they should stay where they are and swing the lens rather than move closer, awareness of exactly what focal length they have on, rather than just tweaking the barrel, solidifies your knowledge of focal lengths. But that knowledge consists of awareness of the field of view and depth of field characteristics of different focal lengths and not their ‘depth characteristics’, which as we now know, don’t belong to focal lengths at all but to camera-subject distances, to proximities.

Just before I go, I need to bring you back to reality. In this article, I have made distinctions stark and situations exaggerated, because things are so muddled up that if you don’t point the conceptual lines out clearly then they’re impossible to see. The reality is that you’re going to be framing for a shot size most of the time, and if you’re experienced enough you’ll know the proximity a certain focal length will force for a certain frame size. So a competent DP asking for a 32 could just as well be thinking “That’s the lens dictated by my choice of frame size and proximity” as “I know this is a lens that’ll give me roughly the correct proximity for my frame size”. The important thing is to remember the difference.

And finally, a disclaimer. By heavily intellectualizing all this, I don’t mean to suggest that the only valid approach on set is an intellectual one. You could have two DP/director teams; one working on a very intellectual level, another on a very instinctive level; both could be capable of producing excellent work. Whatever works for you. I find that the more I think through these things logically off set, the more spontaneous and instinctive I can be on set while still producing good results.

L.

London, April 2013